


Synology NAS and NetExplorer
If you have a Synology NAS, you will find here how to connect it to your platfom.
Install Cloud Sync app 
To connect your NAS to NetExplorer platform, you need to install CloudSync app :
- Go onto your Synology NAS interface, then click on
 to access main menu.
 - Click on Package center to access applications library.
- On the left row, look for "Explore" menu, then click on "All" to access available packages.
- Look for "Cloud Sync" and click on Install.
- When app is installed, you can see it from the main menu.
Notes
If you have more than one disk, you can install it on any of them, there is no need to install it on the disk that will be sync'ed.
Configure Cloud Sync
One application Cloud Sync installed, you will need to configure it.
- Open Cloud Sync
- Select cloud provider : look for WebDAV and select all by clicking on Next(as shown).
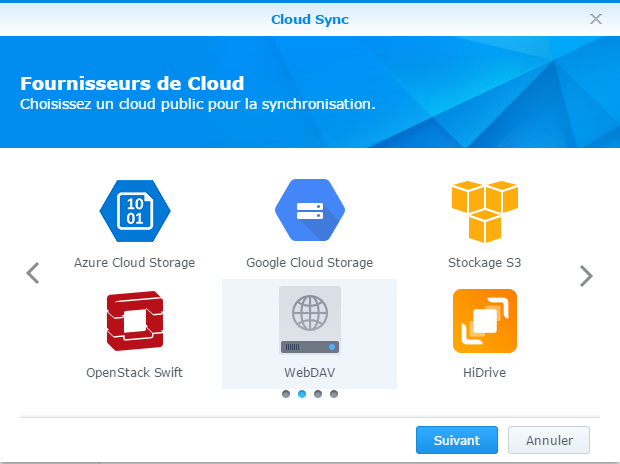 1. Selection of a cloud provider : WebDAV
 - Fill server address , which is NetExplorer platform URL, adding "/dav" in the end.
You must get this type of address : yourplatform.netexplorer.pro/dav
- Type your platform credentials then click on NEXT.
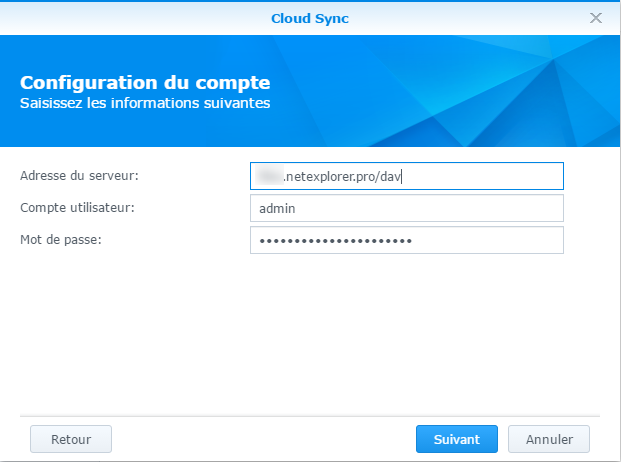
2. Type platform url again (followed by /dav) and your credentials - Choose a name for connexion : Default is WebDAV
- From field "Local path", specify destination folder.
- From field "Distant path", Default display is the root folder from platform. In this way, all of the platforme will be synchronized.If you wish to sync only from a single folder, you will have to specify it > go onto your platform from browser, go to the folder you want to sync and check for number in the end of url, then you can add in the end of server address the following : /dav/#docs/number of folder. (e.g. https://myplatform.netexplorer.pro/dav/#docs/2)
- Choose the way of synchronization :
- 2-way : To get the same content on both sides.
- Download remote changes only : So the NAS only downloads local modifications.
- Upload local changes only : So the NAS only uploads local modifications.
- Check for parameters and click on "Apply".
- Message displays "Congratulations"! You finished configuration successfully" to confirm that link is properly established.
➔ Synchronization starts, "up to day " icon will appear when your sync will be established.
Using Cloud Sync
When Cloud Sync is installed on your NAS, an icon is placed on desktop, you just have top open it to check state of synchronization.
- OVERVIEW tab allows you to see if synchronization is up to date (green icon) or in progress (blue icon).
- TASKS tab shows you the tasks you hav set up. You can add, modify or delete them from here.
- SETUP tab allows you to :
- Set synchronization frequency : from the field surveillance period, which is to be set in seconds. Default frequency is 10 seconds.
- Limite speed of transfers in KB/s. Default is limlitless.
- HISTORY tab, shows activity on NAS. There are no filters or export options.
Consult synchronized data on NAS
On desktop, you will find an application "File Station", it allows you to get an overview on synchronized files.